Designing and Creating Earth Science Lessons
| |||||||||||||||||||||||||||||||||||||||||||||||||||||||||||||||||||||||||||||||||||||||||||||||||||||||||||||||||||||||||||||||||||
| Contents | ||||||||||||||||||||||
|
| |||||||||||||||||||||

| Note: The examples and illustrations in this manual are taken from the Giant Peak Sample Tour. You should have the tour up and running in Google EarthTM while you work through this manual. |
Planning a Lesson
| What Can I Do With Google EarthTM? Since its release in the summer of 2005, Google EarthTM has provided an uncomplicated means of combining aerial imagery with geologic and geographic information in dramatic fashion. The 3D rendering of surface features of the earth can be manipulated easily and incorporated into the Earth Science classroom in a variety of ways. Without a doubt, Google EarthTM visualizations grab students' attention. It's the thoughtful teacher's job to integrate these visualizations into lessons that include important content and inquiry-based learning activities. |
 |
| When you design a classroom lesson around the Google EarthTM program, your students will see the earth from a new perspective. The scale of the Earth, and features that are created or responsible for many of the important earth science processes are often too large and too complex to see easily as a sketch, a drawing on the board, a stationary photograph, or even on a real-life field trip. The aerial imagery in GE can provide a realistic and appropriately scaled representation of the Earth. |
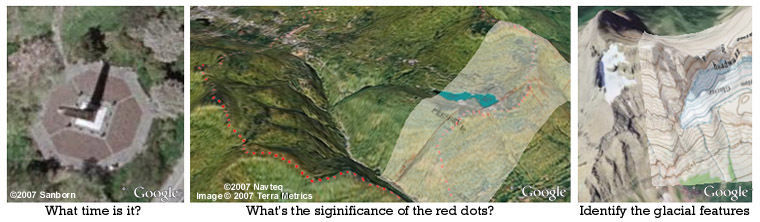
There are at least three unique ways that Google EarthTM can be used in a classroom setting:
|
| Topic | Example |
| Landscape regions of NYS | See the Giant Peak Sample Tour and the DLESE NY Landscape Tours website for examples. |
| Topographic mapping | By applying a topographic map overlay and manipulating the orientation of the landscape, the relation between contour lines and landscape features becomes obvious. |
| Igneous processes such a volcanoes and flows | Slope angles for various volcano types can be calculated |
| Fluvial processes | Meandering streams and oxbow lake formation along the Mississippi; erosion and deposition |
| Glacial vs. stream valley | U-shaped valleys and deep v-shaped valleys |
| Glacial landforms | Ar�tes, horns, etc; lateral, medial, end, and terminal moraine deposits |
| Shoreline processes | Wave refraction; long-shore drift |
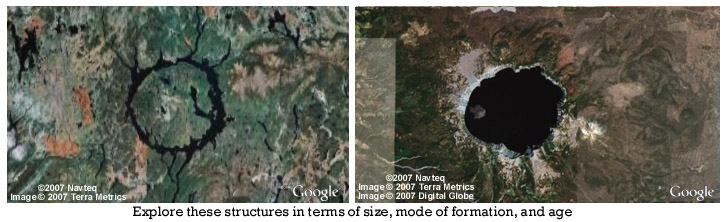
| Meteorite impact craters | Relating crater diameter to the diameter of the impacting bolide. |
| Plate tectonics | Earthquake and volcano locations can be activated to show concentrations near plate boundaries; mid-ocean ridges and trenches are visible, distance of volcanoes and volcanic islands from trenches can be calculated. |
| Structural geology | Especially when used in association with a geologic map overlay, anticlines, synclines, and dipping structures can be seen. |
| Time of day and angle of insolation | Shadows from tall objects such as buildings can help students identify the sun location and the time of day. |
 |
|
What Can I Include in a GE Lesson?
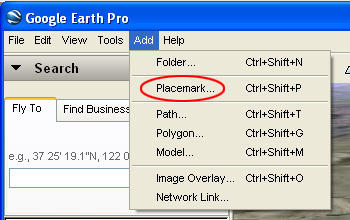
Placemarks.
A placemark is the most basic GE tool, and it is used to identify a particular location, landscape or geologic feature, or point of interest. Placemarks should be included whenever you need to provide specific information- a description, question, image, link or instructions.
|
Organizing Your Lesson As with all good field trips, careful planning is necessary, and the virtual Google EarthTM tour is no different. When developing a lesson in Google EarthTM, consider developing a list (mentally or written) of the desired locations for the tour placemarks, and imagine that students will eventually use the tour of placemarks as a virtual field trip. This field trip will include several stops that have some geologic/geographic significance. Think, too, about how and where you want to link your classroom lesson into your GE tour. It might consist of an activity at each stop with instructions to students embedded right in the placemark. Or, the lesson may be a Word or .pdf document linked from the placemark, as is the case in the sample Giant Peak tour (See the Image and File Hosting section below). You will find this planning tool helpful as you organize your thoughts and materials. Once you complete your planning, you are ready to move into GE and start building your tour! |
Creating a Google EarthTM Lesson
Creating and Saving Folders and Placemarks
| Creating a Folder A Google EarthTM tour with more than one stop should be created in its own folder in "My Places". Making a new folder in the Places frame involves 3 simple steps: 1. Navigate to the place you want your audience to see when they open the folder. Adjust the zoom and tilt to suit your liking/needs. 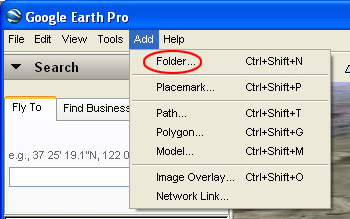
|
 |
|
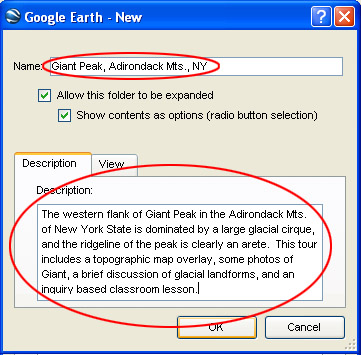
2. Click on "My Places" in the places frame to select that destination for the new folder. 3. From the toolbar, click "Add" and then "Folder" as indicated above. The "New" folder dialog box will open as shown to the right above. Type in a name for your folder. Then type in a description of the contents of the folder. The image above is a screen shot of the folder that contains the sample tour and lesson that accompanies this manual. Generally, you will want the "Allow this folder to be expanded" box checked, and the "Show contents as options" box unchecked. When you press "OK", the folder will be created and saved in "My Places". See also Moving Folders and Editing Folders | |
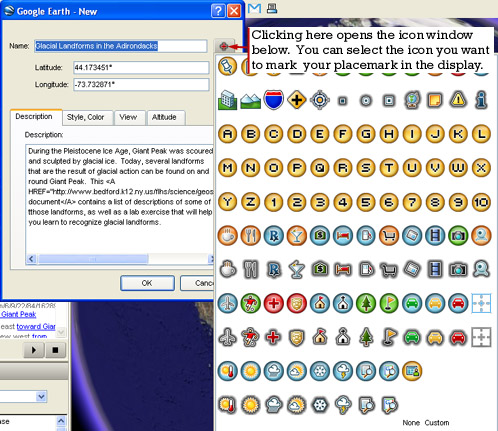 |
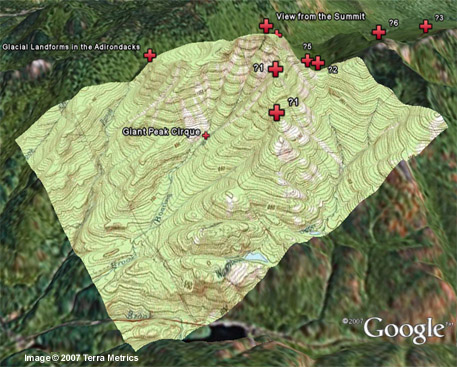
4. In the dialog box that opens, type in the name and description of your placemark (this is the text that will appear when your placemark is displayed in GE). The image to the left was made as the "Glacial Landforms in the Adirondacks" placemark was made. The default placemark icon is Once you've selected an alternate icon, all subsequent placemarks will default to the alternate. The Latitude, Longitude, and View are all set automatically to match the display you set as you began to make your placemark. You can play with the Style,Color and Altitude settings, but the defaults will work fine.See also Moving Placemarks and Editing Placemarks |
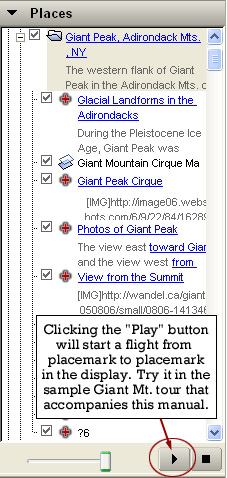 |
Ordering Placemarks in a Tour When creating and adding placemarks to a tour folder, each successive placemark will be added to the top of selected folder in the Places frame. Tours play in order from the top down. Creating placemarks in your folder in a logical sequence will create a 'backwards' tour (i.e. the first location created will be the last 'stop' on the tour). Tour placemarks can be rearranged by clicking and dragging each stop into its appropriate position in the tour list (See also Moving Placemarks). One suggestion to aid with the re-arrangement of the tour is to number the stops sequentially. When re-ordering the placemarks, 'stop' number 1 should be at the top of the tour folder, and stops should continue in numerical order. Notice that a number of the stops in the sample Giant Peak tour are numbered. Remember, placemarks can be edited at any time. |
| Saving and Sharing Folders and Placemarks Once you have created folders and placemarks in my Places, GE will save them there. But if you want to bring your GE tours to another computer, send them to a friend, or post post them to the web, you will have to save them as separate .kml or .kmz files. To save a folder or placemark, simply right click the folder/placemark you wish to save, and select "save as" as indicated in the image to the right. Select or create and select a folder on your hard drive to hold your GE files. You can save your files in either .kml (Keyhole Markup Language file) or .kmz (Keyhole Markup Zip file)format. It makes sense to save folders containing several placemarks as .kmz files. When you click a .kml or .kmz file in My Computer, it will automatically open with Google EarthTM. |
 |
Images and Hyperlinks in Placemarks
| Putting images and hyperlinks neatly into placemarks requires the knowledge of just a little HTML. But don't worry, it's not that hard, and what you need to know is very limited. In this section, you'll learn the basic HTML tags you'll use, and if all else fails, how to "steal" the necessary code from existing placemark descriptions. The image and information link in the placemark below were found through a simple Google search for "Giant of the Valley". Using a few HTML tags, it was easy to display the image and link to the site within the placemark description. The "How To" follows. | |
| This placemark.... | ...was generated by this description. |
 | |
| All instructions, or tags, in HTML are enclosed by < and > brackets. For instance, typing <CENTER> into a placemark description will center all the content - images and text - that follows. A particular instruction can be turned off by placing / within the < and > brackets, before the instruction. </CENTER> will turn off centering, and all content that follows will default to the left margin. The table to the left below contains all the HTML you need to make a good looking and functional placemark. | |
 | In this table the HTML is black, and annotations are in red. Google EarthTM supports other HTML in descriptions, too. If you know a little HTML, you can change fonts and create tables to display images and/or text side by side, but that is beyond the scope of this manual. |
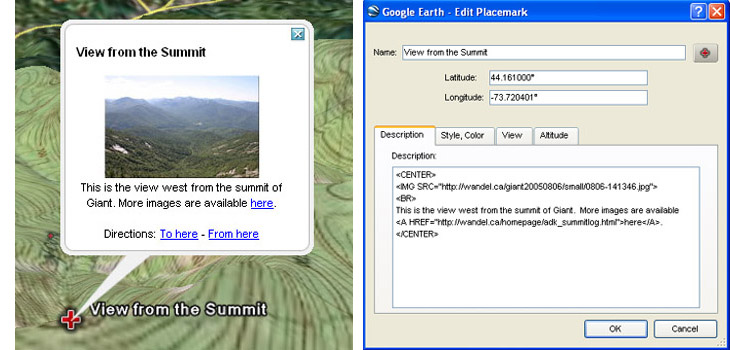
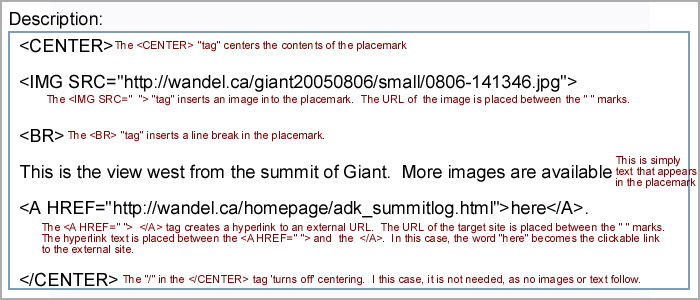
| The image below, also annotated in red, is the description that produced the "View from the Summit" placemark in the accompanying GE tour. | |
 | |
| If All Else Fails (Or even if it doesn't) you can find a placemark in an existing lesson or tour that you like the appearance of. Right click it in the Places frame, and select Properties. Copy the Description to your new placemark, and replace URLs and text while keeping the HTML intact. (See Editing Descriptions, too) |
| Re-sizing Images from the Internet You're quite likely to want to include images you've found on the internet, but the image size may be too large to fit your placemark they way you's like. The remedy is quite simple, and just involves adding width and height specifications to the <IMG SRC=" "> tag. Follow these steps to resize an image in your placemark:
<IMG SRC="http://www.stevekluge.com/icecrystals/icecrystalepodweb.jpg" WIDTH="450" HEIGHT="193"> |
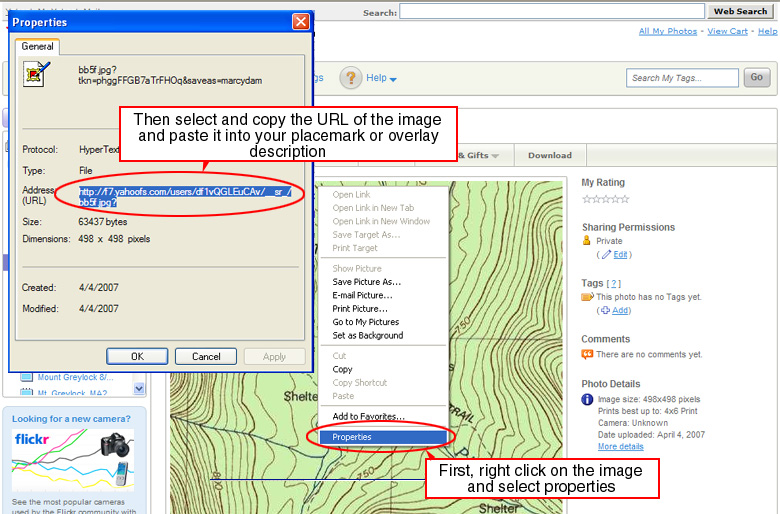
| Using Your Own Images Rather than linking to someone else's images, you may want to use your own. While images that you own can be attached to a .kmz file, the image will greatly increase the size of the file and increase file download times as well. Furthermore, we have experienced some trouble getting images to reliably travel with a GE file. For those reasons, we recommend hosting your images at one of the sites listed in the Image Hosting section of this manual. Instructions for uploading your images are at those sites, and generally you will have to open a free account to do so. Once your picture is up on the host site, you can retrieve its URL by right clicking the image and selecting "properties". You can cut the URL from the properties window that opens and paste it between the " " in the <IMG SRC=" "> tag in your placemark description. It is quite likely, however, that your images will be the wrong size to fit your placemark. You can resize the images right in your placemark (see the resize section above). Alternatively, you can download and install Easy Thumbs, a free and easy to use image resizing and editing tool (other options are listed in the Imaging Processing section of this manual). Generally, images will need to be no larger than 450 pixels wide or high, and since they will be viewed on screen, jpg quality can be set to 70% with no significant degradation of appearance. |
Adding Map Overlays to your Google EarthTM Tour
| One of the most dramatic things you can do with Google EarthTM is to drape a map over the three dimensional landscape display. In order to do this, you need a digital image of a map of the area you wish to overlay. There are several sources of such maps: Topozone.com, Maptech.com, USGS, and scanned paper maps. We've found the maps at MapTech's free map server to be of high quality at various zoom levels and sized right for GE overlays. Once you've located the map you want at the scale you want, right click the map and save it to your hard drive with an appropriate name. | |
 |
The Giant Peak overlay map in the screen shot to the left was saved from the MapTech site as "giantmap.jpg" You can view giantmap.jpg on the author's server here. Once you've saved your map, upload it to your image hosting site (see the section on Images above for information on hosting images). Right click the map image at your hosting site, view properties, and note/copy the URL of your map image. You will need the URL when you create your overlay. |
| Adding an Overlay to the Display First, make the following adjustments in the Layers frame: turn on "Roads" and turn off "Terrain". You may want to turn off everything else as well. | |
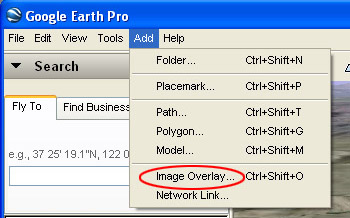
| On the dispay, Use the navigation controls to set North to the top of the display, and adjust the view so that your are looking directly down on the center of the area where your map will drape over the landscape. Make sure the display area is a little larger than the area your map will cover. Click on the folder you created in "My Places" to select the destination for the overlay. From the toolbar, click "Add" and then "Image Overlay" as indicated to the right. A green square will appear on the display, and the "New" image overlay dialog box will open as shown below. |
 |
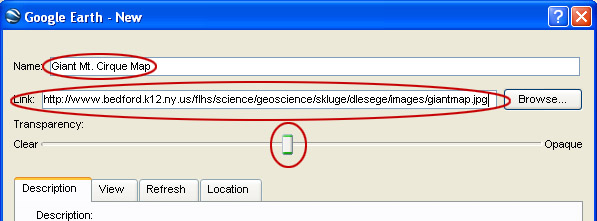 |
Type in a name for your overlay in the New overlay dialog box. Then enter the URL of the map you want to overlay. Google EarthTM will fetch the map, and place it in the green square on the display. Finally, adjust the Transparency slider to the middle of the scale. |
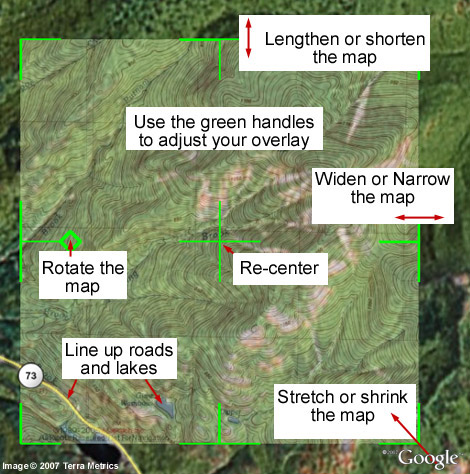
| Adjusting Your Map Overlay It's unlikely that your map ended up exactly where it should be. Use your mouse on the green guides to re-center, stretch, shrink, rotate, and otherwise prod the map into position. Use roads and bodies of water, and any other landmarks that appear on both map and GE display to align the map properly. You can slide the Transparency: control back and forth to check the "fit" of your overlay too. The first few times you do this, you're likely to be a little frustrated. Don't worry, it gets easier. When you're done, click "Okay" and Google EarthTM will save your properly positioned map to your folder in My Places. Editing Overlays |
 |
Useful Tools
|
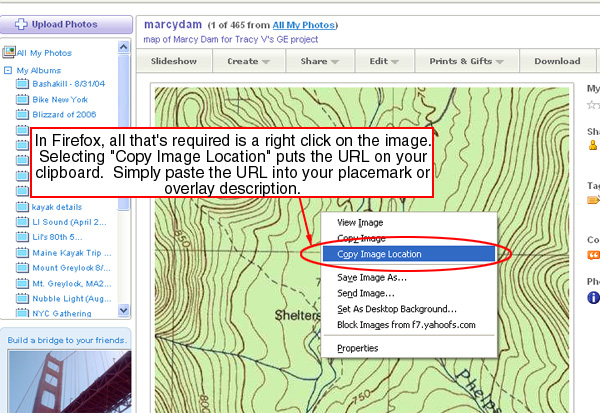
Image Processing Text Editing Image and File Hosting Using Images Hosted at Yahoo Photos The following section describes how to use images hosted at Yahoo Photos. Other image hosting sites will work in much the same way. ...In Internet Explorer ...In Firefox There are also sites that will host your .doc files. File Den will keep your files indefinitely, and you can link directly to them from your Google EarthTM placemarks. For a list and reviews of other image and file sharing sharing, visit Free WebHosts. |
Appendix: Using Google EarthTM
|
Downloading and Installing Google EarthTM To install the program, visit the web address above and follow their directions.
|
|
Controls and Navigation 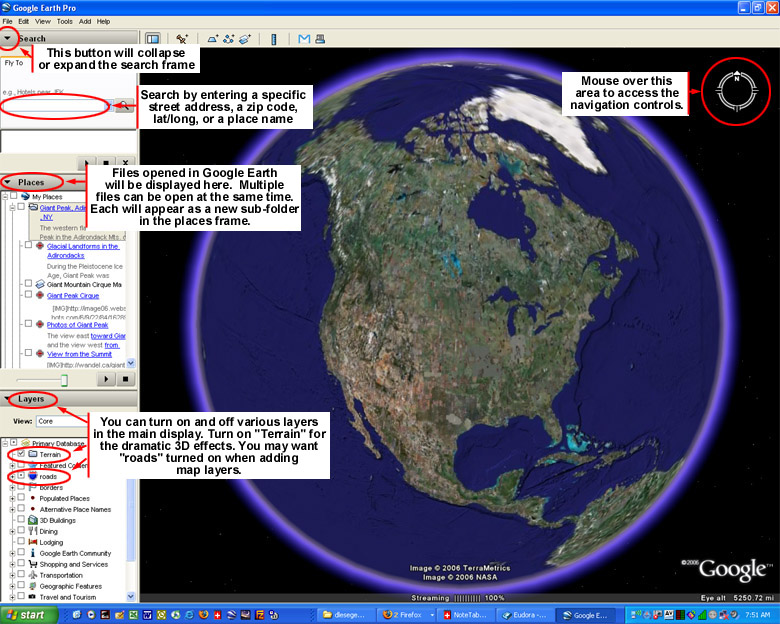
|
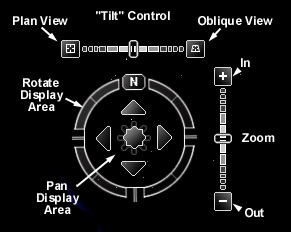 |
When you mouse over the navigation area on the upper right of the display, the navigation controls expand, as illustrated to the left. Experiment with the controls to navigate around the display. You can also navigate using your mouse buttons (see below) and/or your keyboard. |
Mouse (PC with a wheel) Controls
Function |
Mouse Control |
Move the view up/down and right/left |
Hold left button, move mouse up/down, right/left |
Zoom in |
Hold right button, move mouse down |
Zoom out |
Hold right button, move mouse up |
View at a more direct angle |
Hold wheel/middle button, move mouse up |
View at a less direct angle |
Hold wheel/middle button, move mouse down |
Rotate view clockwise |
Hold wheel/middle button, move mouse right across the top of the screen |
Rotate view counterclockwise |
Hold wheel/middle button, move mouse left across the bottom of the screen |
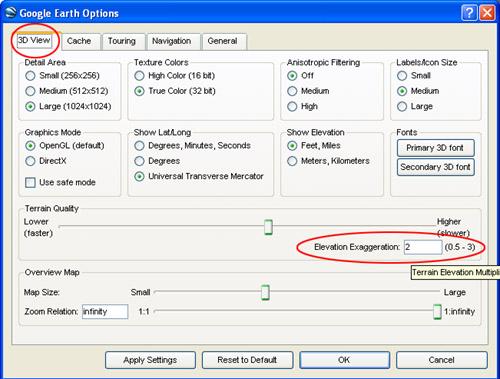 |
In the 3D View tab you can set the display to lat/long or UTM and select english or metric units. The most frequently adjusted setting, however, will be the elevation exaggeration. Use a setting of 3 when viewing areas of low local relief, and a lower setting in mountainous regions. |
| In the Cache tab, you can adjust the memory and disk cache sizes that Google EarthTM creates. If you notice that the program is slowing down, try clearing the memory cache. | 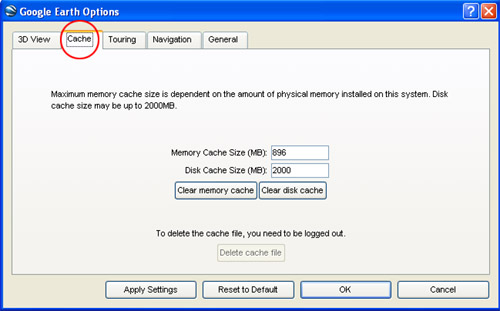 |
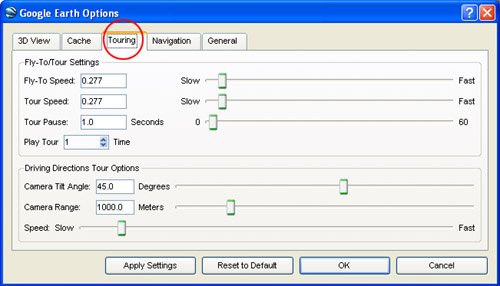 |
In the Touring tab you can make adjustments to the tours that you will be creating. Look the options over, but the default setting will work fine for now. If you find later on that your tour flies too fast or slow, come back here to make adjustments. |